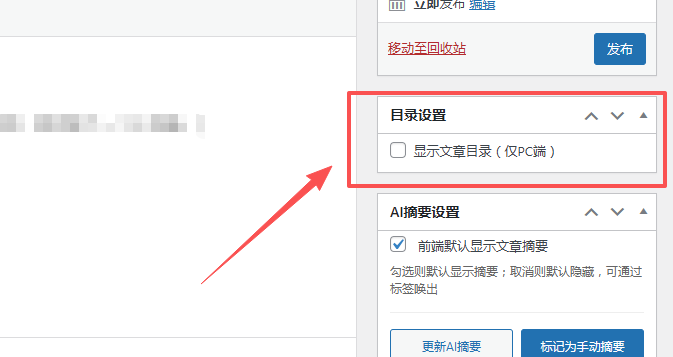
添加一个文章目录功能
最新写文章的时候如果内容多,而且有分类小目录的时候,不易查看,可能根据个人写作习惯有关,我喜欢一段段的加个小标题,所以针对这个需求,就添加了一个小功能。可以在后台写作的时候按需开启。
首先考虑通过php来实现,发现我主题样式改动起来太麻烦了,要改动很多css,于是就通过js来定位实现吧。
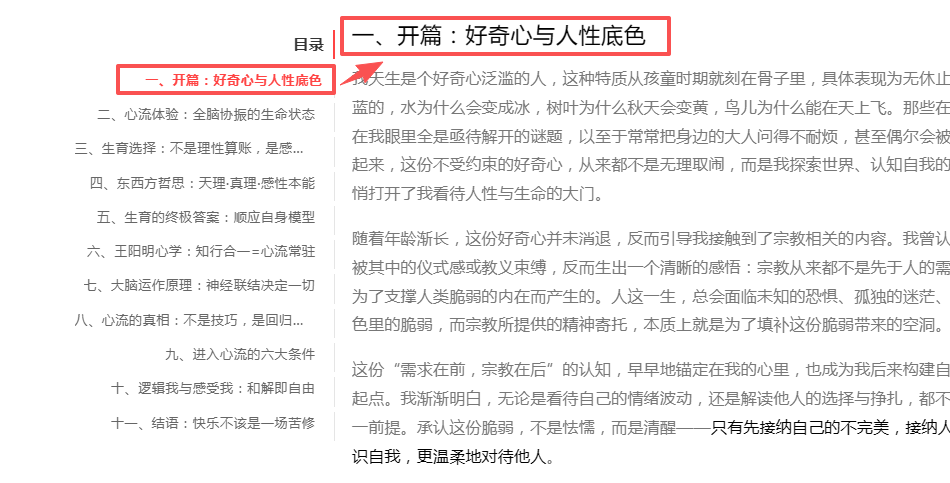
纯目录模式,只认H2,H3
// 纯JS生成目录:只认h2/h3 + 固定悬浮 + 精准高亮 + 避开顶部导航
document.addEventListener(‘DOMContentLoaded’, function() {
// 1. 仅PC端执行(>1024px)
if (window.innerWidth <= 1024) return;// 2. 获取核心元素:仅文章内容区域,排除评论/小组件
const content = document.querySelector(‘.entry-content’);
if (!content) return;// 获取文章内容底部位置(用于判断是否超出文章区域)
const contentBottom = content.getBoundingClientRect().bottom + window.scrollY;// 🔥 关键:定义顶部导航的高度(根据你的实际情况调整,默认300px和目录top一致)
const navOffset = 300; // 这个值和你左侧目录的top:300px一致,刚好避开导航// 3. 只匹配文章内容里的h2、h3标签(不管是否加粗)
const headingElements = content.querySelectorAll(‘h2, h3’);
const tocList = document.getElementById(‘toc-list’);
const tocContainer = document.getElementById(‘custom-toc-container’);
let tocItems = [];
let headingOffsets = []; // 存储每个标题的位置偏移// 4. 遍历h2/h3,生成目录项+记录精准位置
headingElements.forEach((el, index) => {
const text = el.textContent.trim();
// 过滤空标题
if (text.length < 2) return;// 给标题添加唯一锚点(不修改原有样式)
const anchorId = ‘toc-anchor-‘ + index;
el.setAttribute(‘id’, anchorId);// 精准的视口偏移(适配导航遮挡)
const rect = el.getBoundingClientRect();
headingOffsets.push({
id: anchorId,
top: window.scrollY + rect.top – navOffset, // 减去导航高度,精准高亮
bottom: window.scrollY + rect.bottom
});// 生成目录项(h3可加缩进,区分层级)
const li = document.createElement(‘li’);
const a = document.createElement(‘a’);
a.href = ‘#’ + anchorId;
a.dataset.anchor = anchorId; // 绑定锚点ID
a.textContent = text;
// h3标题缩进(视觉区分层级,可选)
if (el.tagName === ‘H3′) {
a.style.paddingRight = ’10px’;
}
// 🔥 修复跳转遮挡:标题顶部距离视口顶部保留navOffset(300px),避开导航
a.addEventListener(‘click’, function(e) {
e.preventDefault();
const target = document.getElementById(this.dataset.anchor);
const targetRect = target.getBoundingClientRect();
// 跳转位置 = 当前滚动位置 + 标题视口位置 – 导航高度(刚好避开导航)
window.scrollTo({
top: window.scrollY + targetRect.top – navOffset,
behavior: ‘smooth’
});
});
li.appendChild(a);
tocItems.push(li);
});
考虑到我的导航位置,会遮挡目录,通过css来调节。
/* 目录核心样式:原生感+清爽感,贴合页面布局 */
#custom-toc-container {
position: fixed;
left: calc(50% – 700px);
top: 300px;
width: 280px; /* 加宽到280px(足够容纳长标题),可根据需要调300px/320px */
padding: 8px 10px 15px; /* 左右加10px内边距,避免文字贴边 */
z-index: 9999;
box-sizing: border-box;
background: transparent !important;
border: none !important;
max-height: 618px;
overflow-y: auto;
white-space: nowrap; /* 强制容器内文字不换行 */
}/* 目录标题:轻量高级,线条配色贴合页面 */
.toc-title {
font-weight: 600;
font-size: 15px;
color: #333;
text-align: right;
margin-bottom: 10px;
padding-right: 8px;
border-right: 2px solid #ff4444;
border-left: none !important;
white-space: nowrap; /* 标题文字也不换行 */
}/* 目录列表:呼吸感间距,不拥挤 */
.toc-list {
list-style: none;
padding: 0;
margin: 0;
line-height: 1.7;
}/* 目录项:极简线条,右对齐不贴边 */
.toc-list li {
margin: 5px 0;
padding-right: 8px;
border-right: 1px solid #e5e5e5;
border-left: none !important;
text-align: right;
white-space: nowrap; /* 核心:强制文字不换行 */
overflow: hidden; /* 防止超长文字溢出容器 */
text-overflow: ellipsis; /* 极端超长时显示省略号,不破坏布局 */
}/* 链接文字:原生质感,hover轻量反馈 */
.toc-list li a {
text-decoration: none;
color: #666;
font-size: 13px;
transition: color 0.2s ease;
display: inline-block; /* 确保链接占满li宽度 */
max-width: 100%; /* 不超出容器 */
overflow: hidden;
text-overflow: ellipsis;
}/* hover效果:轻量变色,不刺眼 */
.toc-list li a:hover {
color: #ff4444;
text-decoration: none;
}/* 新增:当前激活的标题高亮 */
.toc-list li a.active {
color: #ff4444;
font-weight: 600;
border-right: 1px solid #ff4444; /* 高亮线条 */
margin-right: -8px; /* 对齐线条 */
}/* 非PC端完全隐藏(平板/手机) */
@media (max-width: 1280px) {
#custom-toc-container {
display: none !important;
}
}
最后就是按需展示了。我设置的仅在PC端展示,1280px以下都不展示了。
// 5. 有目录项才显示
if (tocItems.length > 0) {
tocItems.forEach(item => tocList.appendChild(item));
tocContainer.style.display = ‘block’;// 6. 精准高亮 + 超出文章区域隐藏目录
function updateTocState() {
const scrollTop = window.scrollY;
const viewportHeight = window.innerHeight;
let currentAnchor = ”;// 1. 判断是否超出文章内容区域(评论/小组件部分)
if (scrollTop + viewportHeight/2 > contentBottom) {
// 滚动到文章底部/评论区:隐藏目录
tocContainer.style.display = ‘none’;
return;
} else {
// 在文章内容区域:显示目录
tocContainer.style.display = ‘block’;
}// 2. 精准匹配当前可视区域的标题(避开导航)
for (let i = headingOffsets.length – 1; i >= 0; i–) {
// 标题顶部进入「导航下方区域」,判定为当前标题
if (scrollTop >= headingOffsets[i].top) {
currentAnchor = headingOffsets[i].id;
break;
}
}// 3. 高亮当前标题,移除其他高亮
document.querySelectorAll(‘.toc-list a’).forEach(link => {
link.classList.remove(‘active’);
});
if (currentAnchor) {
document.querySelector(`.toc-list a[data-anchor=”${currentAnchor}”]`)?.classList.add(‘active’);
}
}// 初始化 + 滚动/窗口大小变化时触发
updateTocState();
window.addEventListener(‘scroll’, updateTocState);
window.addEventListener(‘resize’, updateTocState);
}
});
这样,文章内容目录就是我所需要的了。效果如下
修复AI摘要Token明文的BUG
闲来F12的时候突然发现js部分输出了我token,bot_id部分,及时发现,及时整改。
我在 xiaopiblog_coze_add_scripts() 函数里写了
$token = esc_js($coze[‘token’] ?? ”);
$api_url = esc_url($coze[‘api_url’] ?? ‘https://api.coze.cn/open_api/v2/chat’);
$space_id = esc_js($coze[‘space_id’] ?? ”);
$bot_id = esc_js($coze[‘bot_id’] ?? ”);
直接就把明文塞进了前端JS
fetch(‘{$api_url}’, {
method: ‘POST’,
headers: {
‘Authorization’: ‘Bearer {$token}’, // 明文 token
},
body: JSON.stringify({
space_id: ‘{$space_id}’, // 明文 space_id
bot_id: ‘{$bot_id}’, // 明文 bot_id
})
})
这样别人F12就能看到我的Token明文密钥,实在是粗心。修改之后前端再查看,已经不会显示明文了。
// 安全生成摘要(走自身后端)
var delayExcerpts = document.querySelectorAll(‘.coze-ai-excerpt.delay-generate’);
for (var j = 0; j < delayExcerpts.length; j++) {
var el = delayExcerpts[j];
var postId = el.getAttribute(‘data-post-id’);
var content = el.getAttribute(‘data-content’);fetch(‘https://blog.ouxiaopi.com/wp-admin/admin-ajax.php’, {
method: ‘POST’,
headers: { ‘Content-Type’: ‘application/x-www-form-urlencoded’ },
body: new URLSearchParams({
action: ‘xiaopiblog_coze_safe_generate’,
post_id: postId,
content: content,
nonce: ‘a96c225aac’
})
})
采用动态nonce,应该没问题了吧。


评论 (16)
token泄露被盗用的话,可能会篡改内容,费用增加,好在及时发现。
确实哦,不过我目前用的还是送的套餐,问题不大,一点不慌,哈哈。
ai生成的修改吗
对啊,现在都直接扔给ai写了。
你这个导航好玩,下拉页面的时候把自己变小了。
哈哈
博文中的代码区的样式还挺好看的
膜拜一下技术牛,主题设计的很有创意,简洁大方。
谢谢喜欢!
代码的缩进是代码块样式问题没有了么
看着一堆代码,欲欲一试的心又放下了
哈哈!
自己写主题就是会遇到这类各种各样的Bug,不过这也是折腾的乐趣吧哈哈
嗯,是这样的😊
文章不错支持一下吧
文章不错非常喜欢,支持一下